
14-Day Money-Back Guarantee
0
The short answer
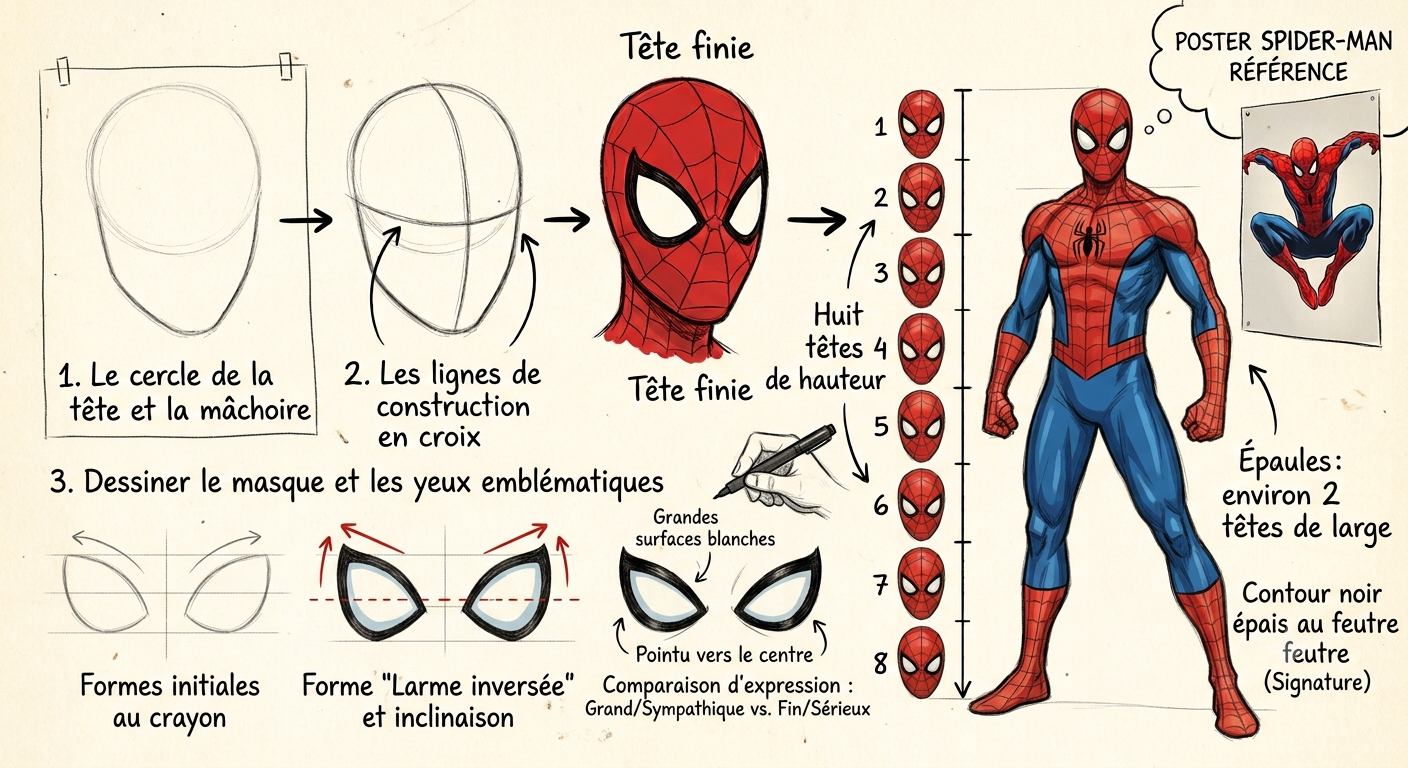
Start with a circle extended downwards by a jaw, then draw a light guide cross: it places both eyes at exactly the same height. Next come the white almond shapes outlined in black, then the body over seven to eight head heights, then the web. Step-by-step details below.
There is a magical moment in the life of every superhero fan: the one where you pick up a pencil and decide, for the very first time, to draw Spider-Man yourself. Good news: it is not reserved for professional artists. With the right method, a few simple shapes and a little patience, a six-year-old child or a complete beginner of a parent can end up with a recognisable Spider-Man from the very first session. The secret is not innate talent, but something far more reassuring: step-by-step construction.
In this warm, 100% practical guide, we are going to break it all down together. The kit that genuinely helps, the proportions of the head, the mask and its famous white eyes outlined in black, the web pattern that makes all the difference, the dynamic pose of the web-slinger in mid-leap, the adorable chibi version for younger children and the detailed version for those who want to progress. We will finish with the classic mistakes to avoid and a FAQ to answer your last questions. Make yourself comfortable, grab a sheet of paper: let's begin.
The kit to get started (without breaking the bank)
People often think you need expensive equipment to draw. That is simply not true. For your first Spider-Man drawings, a plain pencil and a sheet of paper are more than enough. What matters is having something to draw lightly with, erase without tearing and go over firmly. Here is the ideal kit; everything you need fits in a pencil case.
| Equipment | What it is for | The pro's tip |
| HB pencil | Drawing the construction shapes | Press very lightly; the line should barely show |
| Putty rubber | Erasing construction lines without damaging the paper | It lifts the pencil instead of rubbing at it |
| Fine black felt-tip | Going over the final outline and the eyes | A 0.5 mm nib for details, a thicker one for outlining |
| Coloured pencils or red and blue felt-tips | Colouring the costume | A bright red and a strong blue: those are the two royal colours |
| Smooth paper | Your drawing surface | Ordinary printer paper does the job perfectly |
One last word on equipment: do not give in to the temptation to buy ten technical pens straight away. The best investment, at the beginning, is practice time, not the best-stocked pencil case. A pencil, a rubber, a black felt-tip and two colours: you already have everything you need for a brilliant Spider-Man.
Proportions and the basic-shapes method
This is the keystone of the whole drawing, the part beginners skip far too often and regret afterwards. You never draw a character in one perfect stroke. You build it from simple shapes that you refine little by little. Think of a sculptor starting from a block: first the overall mass, then the details. With Spider-Man, everything starts with the head.
The circle of the head
Draw a light circle in pencil. This is not the complete head yet, but the skull. Just below it, add a jaw shape that narrows the circle down towards the chin: picture the base of an egg, narrower at the bottom. With Spider-Man, because the face is masked, the head is fairly rounded and smooth, with no visible nose or mouth. That is a huge stroke of luck for beginners: no complicated facial features to handle, just one clean shape.
The construction lines
This is the professionals' trick. Draw a vertical line down the middle of the face, following the curve of the head, and a horizontal line roughly halfway up. Together these two lines form a slightly curved cross. They will act as your guides for placing the eyes symmetrically. The vertical line guarantees that both eyes sit at an equal distance from the centre; the horizontal line guarantees that they sit at the same height. Without those guides, one eye almost always ends up higher or bigger than the other. With them, symmetry becomes child's play.
For the body, remember one simple, effective rule of proportion: an adult heroic figure is about seven to eight heads tall. In other words, if you stacked Spider-Man's head seven times, you would get his full height. For a more dynamic, muscular look, the shoulders measure about two heads across. These landmarks save you from the classic big-head, tiny-legs character. And if you want a model in front of you while you work on those proportions, nothing beats a good reference image: a large-format poster propped up in front of you is a formidably effective learning companion. You can take your pick from our Spider-Man posters for a crisp, detailed model to copy.


The model to copy
Spider-Man Into the Spider-Verse Poster
Nothing beats a crisp, high-definition image in front of you when you are working on proportions. This Into the Spider-Verse poster offers a model packed with detail, perfect for practising.
View the product — €22.90Drawing the mask and those iconic eyes
This is THE moment that turns a plain circle into Spider-Man. The eyes of the mask are the character's absolute signature: get them right and everything else follows. They are sometimes called teardrop eyes, or upside-down-drop eyes. They are two large white surfaces, wide towards the outside of the face and pointed towards the centre, entirely outlined with a thick black line.
The shape of the white eyes outlined in black
Work on either side of your vertical line, using the horizontal line as your base. Draw each eye as an elongated, pointed almond: the wide, rounded corner turned towards the outside of the face, the fine tip aimed at the centre and tilted slightly upwards. That upward tilt is essential; it is what gives the mask the determined, slightly unsettling look we all love. The two eyes take up a large part of the upper face, far more than realistic human eyes would.
Once the pencil shape is right, outline each eye with a thick black contour using your felt-tip, then leave the inside completely white. That pure white against deep black, on a red background, is what makes the gaze so readable even from a distance. A small tip on expressiveness: the bigger and rounder the eyes, the younger, more surprised or more likeable Spider-Man looks. The narrower and more slanted they are, the more serious and combative he seems. Have fun varying them to tell an emotion. This kind of detail is part of a whole visual vocabulary: if the subject fascinates you, you will love discovering the hidden details of the suit that only true connoisseurs notice.

The web pattern: the lines that radiate
Without its spider-web pattern, Spider-Man's red suit is just a red suit. With it, the costume becomes instantly iconic. Many beginners get this stage wrong because they draw the lines at random. In fact the web follows a very precise logic, and once you have understood it, it becomes surprisingly easy to reproduce.
The principle rests on two families of lines. First the radiating lines: they all start from a single central point, usually the middle of the face or the centre of the chest, and spread out like the rays of a sun or the threads of a real web. On the mask, imagine everything starting at the tip of the nose and opening upwards, sideways and downwards. Then the curved lines that join those rays together, forming light arcs, like smiles or hammocks strung from one ray to the next. It is the combination of straight rays and curved arcs that creates the famous web grid.
A crucial tip so you do not get discouraged: draw the pattern right at the end, only once you have settled the character's outline. And above all, follow the shape of the body. On the curved chest, the lines bend; on an arm, they follow the cylinder of the muscle; in a hollow, they tighten. The web is not laid flat like wallpaper, it wraps around the volume. That is exactly what creates the illusion that the suit really is worn by a body in three dimensions. Do not chase millimetre-perfect accuracy: a slightly irregular web stays completely believable, the eye understands the intention.
The body and a dynamic pose
Spider-Man is never as stiff as a lamp post. He is an acrobat, an urban dancer. Drawing him standing still, arms by his sides, is like drawing a sleeping cheetah: technically correct, but you miss his soul. The good news is that a dynamic pose is no harder than an upright one, provided, once again, that you start from a simple construction.
The crouching pose and the leap
Start with a stick figure, that skeleton of lines and circles we all learn as children. For the iconic crouching pose, the one where Spider-Man is perched like a spider ready to pounce, draw the back curved forwards, the knees drawn up high and apart, one hand planted on the ground between the legs and the other arm outstretched or raised. For the leaping pose, stretch the whole body diagonally across the sheet, one leg tucked in and the other thrown back, the arms spread as if he were slicing through the air. The diagonal is your best friend: a character leaning across the page always looks more alive than one standing neatly upright.
Once the stick figure is in place and the pose is settled, dress that skeleton in simple volumes: ovals for the torso and the pelvis, cylinders for the arms and legs, circles for the joints. Only then, when you are happy with the silhouette, do you refine the muscular outline and add the web. To understand how the limbs really articulate in space, nothing replaces an object you can turn over in your hands: an articulated figurine is an extraordinary three-dimensional reference, showing you the true foreshortening and the true shadows from any angle. Have a look at our Spider-Man figurines to build yourself a little 3D model to keep on your desk.

Your 3D model
Spider-Man Figurine
To understand how the limbs articulate from every angle, nothing replaces an object you turn over in your hands. A formidable drawing companion to keep on the desk.
View the product — €69.90Easy version for little ones, or detailed version
There is no single right way to draw Spider-Man, but two broad approaches depending on age and appetite. Understanding which one to choose saves a lot of frustration, especially when you are drawing with a child. The idea is never to make it complicated, but to make it within reach.
The chibi or kawaii version for the very young
For a nursery or early primary child, forget muscles and realistic proportions. Go for the chibi style: an enormous perfectly round head that takes up almost half the character, a small stocky body and short, rounded limbs. The eyes of the mask become gigantic and adorable; the result is cute rather than heroic. This version is a gift for small hands: few lines, lots of easy curves, an immediately rewarding result. A child can finish a complete chibi Spider-Man in a few minutes, and that is exactly what they need to build confidence and want to start again.
The detailed version, to progress
For a pre-teen, a teenager or an adult who really wants to progress, you move on to the detailed version: realistic proportions at seven or eight heads, musculature suggested by curves, a complete web that follows every volume, a play of light and shadow. It takes longer and asks more of you, but every drawing becomes a small victory. The right teaching instinct, when several of you are drawing together, is to let everyone pick their own level: the little brother does his chibi while his big sister perfects her muscular version, and nobody feels they have failed. If you are looking for something ready-made for the youngest, our Spider-Man colouring pages to print let them practise on the outline before launching into free drawing.
Colouring Spider-Man: the red and the blue
Spider-Man's classic suit rests on two bold colours: red and blue. But be careful, they are not spread about at random. The red covers the head, the upper chest, the middle of the back, the hands and the lower legs. The blue takes the rest: the sides of the torso, the arms, the pelvis and the upper legs. That zone-by-zone split is a very useful landmark when colouring; it gives the suit its recognisable structure. The subject is covered in more detail in Why is Spider-Man's suit red and blue?.
For a clean result, two precious pieces of advice. First, colour from light to dark: start by laying down a light, even layer, then strengthen the shadow areas by going over them. Second, respect the direction: always apply your pencil strokes the same way within each zone; this avoids the scribbled look and gives a smooth, clean finish. As for the web pattern, it is always drawn after you have coloured the red: you go over the black lines on top of the colour, never the other way round, or the web disappears under the red pencil.
One little touch that changes everything: add a slight white highlight, an area left uncoloured, on the curved parts of the suit, such as the tops of the shoulders or the upper chest. That point of light suggests the material is slightly shiny, like a clinging stretch fabric, and instantly gives your drawing depth. It is a tiny detail with a spectacular result.

The mask in close-up
Spider-Man Mask in Red Poster
The eyes of the mask are Spider-Man's signature. This poster is a feast for the eyes and makes an ideal reference for getting that all-important detail right.
View the product — €22.90Beginners' mistakes to avoid
Getting better at drawing is as much about learning the right moves as it is about avoiding the classic traps. Here are the missteps almost every beginner makes and which, once spotted, are corrected very quickly. Knowing them in advance will save you weeks of practice.
The first mistake, and by far the most common, is pressing too hard from the start. You draw the construction shapes by digging deep into the paper, and then it is impossible to erase them cleanly: they stay there as ghosts under the final drawing. The golden rule: with a pencil, you stroke the paper, you do not carve it. The second mistake is skipping the construction stage and drawing the final outline straight away. You end up with a distorted head, mismatched eyes and a body with wonky proportions. Always take the time for the circles and the guide lines, however tempting it is to rush.
Third trap: asymmetrical eyes. One eye higher, bigger or more tilted than the other is enough to ruin the whole face. The remedy, as we have seen, lies in the horizontal construction line. Fourth mistake: a web laid out flat, with rigid lines that do not follow the body, which flattens the character and makes him look like a sticker. Finally, the fifth, more discreet but destructive: comparing yourself with other people's drawings and losing heart. Every artist started with clumsy drawings. Your only competitor is your own drawing from yesterday. Keep your attempts, date them, and look at how far you have come in a month's time: progress is always faster than you think.
Drawing other versions of Spider-Man
Once you have mastered the classic Spider-Man, a whole universe opens up. The great advantage is that you reuse exactly the same base: the construction does not change, only the colours and a few details. It is the most motivating way to keep progressing without starting from scratch.
Miles Morales
Miles Morales's suit is a treat to draw because it plays on a powerful contrast: a dominant deep black lifted by bright red. The structure of the mask and the eyes stays the same as the traditional Spider-Man, but the web is often less present, replaced by large flat blacks and red touches on the mask, the hands and the spider on the chest. To colour black without smudging, leave fine uncoloured lines to suggest the bluish sheen of the fabric. If the character intrigues you, dive into his story with our article on who Miles Morales is, it makes you want to draw him even more.
The black symbiote suit
The black suit, the symbiote one, is probably the easiest to colour and one of the most striking to look at. Here everything is black, with a large white spider spread across the chest and the back, its legs stretching elegantly towards the shoulders and the lower torso. There is no web to draw, which makes the job far simpler: concentrate on a clean silhouette and on a nicely symmetrical spider. It is an excellent version for practising dynamic poses without worrying about the pattern. The world of alternative outfits is vast and fascinating: for inspiration, browse the legendary suits to draw, there is enough there to fill a whole sketchbook.
Our tips for really making progress
Talent in drawing is almost never a gift, it is mileage. Here are the habits that make the real difference between the person who stalls and the one who takes off, and they are within everyone's reach, child or adult.
First, draw often and briefly rather than rarely and at length. Ten minutes a day are worth more than one big session a month. Next, copy models without embarrassment: copying a crisp image is not cheating, it is how every artist has learned to see shapes. Observe, break down, reproduce, then little by little invent your own poses. Third lever: vary the emotions and the angles. Draw a Spider-Man from behind, a close-up on the mask, laughing or falling. That gymnastics develops your understanding of volumes far faster than repeating the same front-on pose.
Finally, surround yourself with good references and keep drawing joyful, especially with children. A poster on the wall, a figurine on the desk, a sketchbook within reach: the more visible the trigger, the more you draw. And if you are looking to pass that passion on to a young fan, our guide to Spider-Man gift ideas is packed with suggestions to feed their creativity. Drawing is not a competition, it is a pleasure that grows with every stroke of the pencil.
FAQ: your questions about drawing Spider-Man
From what age can a child draw Spider-Man?
From 4 or 5 with the chibi version, heavily simplified, where everything starts from one big circle and two big eyes. Around 8 or 9, a child can tackle the version with proportions and the web, as long as you take it step by step. The key is to match the difficulty to the age so the result stays rewarding and makes them want to start again.
How do you get the eyes of the mask right every time?
The secret comes down to two words: construction lines. First draw a light cross on the face, then draw each eye as an almond, wide on the outside and pointed towards the centre, tilted upwards. The horizontal line guarantees they sit at the same height. Only then do you outline them with a thick black line, leaving the inside nice and white.
Should you draw the web before or after the outline?
Always after. You finalise the silhouette and the character's outline first, you colour the red, and only at the very end do you add the web pattern on top. The lines should radiate from a central point, then be joined by small curved arcs, and above all follow the volumes of the body rather than staying flat.
Which colours should you use for the classic suit?
A bright red and a strong blue. The red covers the head, the upper chest, the middle of the back, the hands and the lower legs; the blue takes the sides of the torso, the arms and the upper legs. Colour from light to dark, in a consistent direction, and leave small white highlights on the curved areas to give depth.
I have no talent at all, can I still do this?
Absolutely, and it is the most important truth in this guide. Drawing is not a gift reserved for a chosen few, it is a method you learn and a practice you build up like a muscle. By following the step-by-step construction, drawing a little every day and keeping your attempts to measure your progress, you will get results that surprise you. Your only judge is your drawing from yesterday. Pick up a pencil, smile, and go for it.

